Posts tagged ‘Chocolate’
Holiday 2011: Super Simple Stocking Stuffers
Welcome to the first installment of my Holiday 2011 series.
I know, I’m a master at creating clever names. 😉

During the last 6 months, I’ve been a bad, bad blogger. I hope Santa you forgive me. I’ll get more into that in a later post, but for now just know I’m back!!
I love this time of year. Everything about it is magical. To celebrate this special time, I will be writing posts at least once a week about fun, holiday-related topics: recipes, traditions, healthy living – you name it!
In this post, I am sharing with you a cheap, customizable, and easy to make gift. These make great hand-outs at school, goodie bags for holiday parties, and stocking stuffers!
Super Simple Stocking Stuffers
Ingredients:
- Paper Bags
- Mini candies – e.g. Hershey Kisses, regular and peppermint
- Gift tag stickers – optional
- Markers
Method:
I decided that each of my gift bags would include 9 kisses (1-serving) of each flavor.

Toss the candy inside the paper bag without fully opening the bag and flattening the bottom.

Love the lighting through the paper in the photo below.

Wrap the top of the bag around the package/candies and tape the end.


Next, label it and you’re done! You can either go the easy route and use a store bought gift label, like the one below (from Walgreens).

I wasn’t too happy with the quality of the label, so I came up with a more personalized, cheaper method. Draw your own, like I did below. You can customize this however you like thanks to the blank slate of the brown paper. I love the look of it!

Voilà! It’s that simple. You now have a Super Simple (and yummy!) Stocking Stuffer – or whatever else you want to use it for.
Question #1: What’s your favorite gift-on-the-cheap?
Question #2: Any holiday related posts you’d like me to write? I need inspiration!
Peanut Butter Chocolate Cheesecake
One of the many reasons I love baking is being able to share my creations with those I love, my friends and family, and spread the love. So, when my bestie, Eliza (who is still in school – poor her!), invited me to celebrate her birthday with her at college, I jumped at the chance to bake her a cake.

Eliza and I have a lot in common. For one, we both love peanut butter and chocolate, especially in the form of Reese’s Peanut Butter Cup! That’s why her cake of choice was a Peanut Butter Chocolate Cheesecake.
Since I also made a second cheesecake (White Chocolate Raspberry – recipe to come!), I wanted an easy recipe that didn’t require too many ingredients. After some research, I compiled this recipe from a few difference sources (listed below). What I created was a rich, flavorful cheesecake filled with yummy peanut butter cream cheese filling and topped with chocolate ganache and peanut butter frosting. It’s like a Reese’s cup in cheesecake form!
Peanut Butter Chocolate Cheesecake
Adapted from Brown Eyed Baker, Confections of a Foodie Bride and Sweet Tooth, Sweet Life
Ingredients
Crust
- Homemade or store-bought graham or Oreo crust (9 inch) – I used Ready Crust Reduced Fat Graham crust because I couldn’t find an Oreo crust and buying a crust saved me time.
Peanut Butter Filling
- 12 oz cream cheese, at room temp – I used 4 oz Neufchatel (1/3 Less Fat Cream Cheese) and 8 oz nonfat cream cheese.
- 1/2 cup creamy peanut butter
- 1/2 cup granulated sugar
- 1/2 tsp vanilla extract
- 2 eggs
Chocolate Topping
- 4 oz semisweet chocolate, chopped – I used chocolate chips
- 1 tbsp butter
- 1/2 cup heavy cream
Peanut Butter Frosting
- 1/6 cup smooth peanut butter
- 3/2 cup powdered sugar
- 3/4 tsp vanilla extract
- 2 tbsp cup milk (plus more to achieve desired consistency)
Any additional decorations – I used semisweet chocolate chips and a Reese’s cup
Method
Preheat oven to 350F degrees.
For the peanut butter cheesecake filling…

 Beat the cream cheese and peanut butter together on medium speed until smooth.

 Add the sugar and vanilla extract, and beat until thoroughly combined.
Reduce the speed to low and add eggs one at a time, beating until combined after each addition.

Pour filling over crust.

Bake until the sides of the cheesecake are set and the middle just slightly jiggles, about 35-40 minutes.
 Transfer to a wire cooling rack and cool to room temperature (at least 1 hour).
The edges of mine browned a bit because my oven doesn’t bake very evenly (and I forgot to turn the cake half-way through baking). Yours don’t need to be browned like mine.
While cooling, the raised, “puffy” cheesecake filling sunk in a bit. This is normal. After cooling, it looked like this:

For the chocolate topping…

 Put chocolate, butter and cream into a microwave-safe bowl. Microwave in 30 second bursts until hot, stirring (or whisking) in between each burst until smooth.

Pour the chocolate evenly over the tart. Do so slowly, so the chocolate doesn’t pour over the sides.
Refrigerate until set, at least 4 hours or overnight.

For the peanut butter frosting…
Using the amounts outlined in the ingredients, follow the instructions for the frosting from my Chocolate Peanut Butter Cup Cupcakes w/Peanut Butter Frosting recipe.

Decorate as you wish. Be creative! I used the frosting, semisweet chocolate chips, and a Reese’s Cup.
 I made this cake two days in advance, and it travels really well (especially thanks to the plastic crust “saver” that came with the store-bought crust).

This slice is 1/16 of the cake.
I hope you enjoyed this recipe. Please leave a comment. I love hearing from you! If you try this recipe, tell me how it goes.
Question: What is your favorite type and flavor of cake?
My favorite “traditional” cake is probably moist chocolate cake with raspberry filling and lots of chocolate frosting. I am also a huge believe in the power of sprinkles. Sprinkles make anything better! My favorite flavor of cheesecake is, you guessed it, peanut butter and chocolate!
Checking In + Faking Freshly Baked
Hello Everyone!

Story of my life.
Sorry I haven’t posted in a while. I’ve been pretty busy. Well, sorta. My last day of classes was Thursday. Finals officially start on Tuesday, but my three finals are this Friday and Saturday. So, I have a week off to study and pack. The good news? Plenty of time to study and pack. The bad news? I’m not home.
I seriously cannot wait to get home! The suspense/wait is killing me. There are so many things I’m looking forward to at home: friends, family, home-sweet-home, home-cooked meals, eating at restaurants, relaxing, baking (!), and so much more! Of course, I’m seriously looking forward to anything food related!
I having a bit of a blogger’s block right now. All I can think about what I will make and blog about when I’m home but not here, right now in Boston. I’m also pretty busy studying and packing and doing other end-of-stay activities. So, this is me checking in. Hello! I fly home Saturday night, and I’ll have some new recipe posts soon after!

However, I don’t want to leave you now without anything food related. So here is a quick story and tip:
One food I’ve been missing with all my heart is freshly baked chocolate chip cookies. That fresh-out-of-the-oven flavor and texture (for one thing, because of the melted chocolate) seriously can’t be beat! Since I have no access to an oven here, I can’t get them here – except for the occasional Deep Dish Sundae from Uno Chicago Grill: vanilla ice cream, chocolate sauce and whipped cream atop a giant chocolate chip cookie freshly baked in a deep dish pan. All I can say is foodgasm x 100!!
Any who, I recently found a way to not only get that freshly-baked flavor in the comfort of my own dorm but also in a healthy way! All you need is a Larabar and a microwave. My favorite Larabar flavors for this are Chocolate Chip Cookie Dough and Peanut Butter Chocolate. Chip.

(Source)
First, remove the wrapper from the Larabar and microwave the bar on a napkin or plate for about 15-20 seconds. Then, enjoy!
It’s as simple as that, but it makes an amazing treat! The bar gets warm and doughy, the chocolate chips get melty, and the Larabar goes from good to amazing! Tastes very much like a freshly baked cookie! I sometimes only microwave a small chunk at a time, so each bite is ‘freshly-baked.’
Question: What’s your favorite type of cookie? What’s your favorite type of Larabar?
Friday Favorites: April 29
Happy Friday!
Do you know what that means? Yes, the weekend, but also another installment of my Friday Favorites! I’m running short on time because I have special plans after school, so this will be a short post. Thank you for understanding!
1. foodgawker.com

If you love food porn, you’ll love this website. Foodgawker is a photo gallery that allows you to visually search and discover new recipes submitted by food bloggers. The editors at Foodgawker select the best of the best of the hundred of submissions they get a day. And do you know what that means? Glorious photos of deliciously amazing, drool-worthy food! In other words, food porn at it’s best. I can literally spend hours on their site looking through photos. I’ve found amazing recipes and blogs through it. 🙂
2. Clif Bars

I love all the products and lines that Clif Bar offers, but lately I’ve been all about the traditional Clif Bars. I love the Chocolate Chip Peanut Crunch and Crunchy Peanut Butter. I eat them for lunch sometimes with a big side salad. Yum!
3. Sunny Weather in Boston


<– That’s the temperature right now here in Boston! Love it! I can’t believe it’s warm here. It feels like it was only a few weeks ago that it was snowy and freezing here in Boston. Oh yah, that’s because it was only a few weeks ago. I love how people in Boston can adjust to the weather so quickly. They go from wearing jeans and winter jackets one day and then flip-flops and short shorts the next day. 🙂
But you know what’s even better than this? The fact that, in two weeks, I’ll be enjoying California’s beautiful weather!
*****
Question: What are your Friday Favorites?
I just wanted to give a shout out to all my new readers out there! Thanks for meandering over to my corner of the blog-o-sphere. I’ve been getting a lot of great comments, and I really appreciate it. I love my readers. 🙂 If you have any questions, post requests for me, or anything else, please let me know. I’d love to hear from you!
California Dreaming: Avocados
T minus 17 days until I am back home in California!
Don’t get me wrong. I love Boston, college, my friends here,etc. However, I’m so excited to be finished with school and back home with my family, friends, and kitchen and to start my summer fun!
Although I’m German, I grew up in Northern California and have enjoyed all that California has to offer: the beautiful weather, glorious nature, and amazing, fresh food among so many other great things! California, especially the Bay Area (near San Francisco), is privileged with so much fresh produce. One of my favorite California-grown items are Avocados!

(Source)
Nutritionally, avocados get a (falsely given) bad rep because they are high in fat. However, the fat in avocados are actually really good fat. Here is some info from the The California Avocado Commission about the nutritional benefits of avocados: Avocados provide nearly 20 essential nutrients, including fiber, potassium, Vitamin E, B-vitamins and folic acid. They also act as a “nutrient booster” by enabling the body to absorb more fat-soluble nutrients, such as alpha and beta-carotene and lutein, in foods that are eaten with the fruit. In addition, avocados can help you meet the American Heart Association dietary guidelines because avocados have both monounsaturated and polyunsaturated fat (aka the good fat!) and contain potassium.
Click here for more about why the nutrients found in avocados are important. For nutritional information of avocados, click here.
As you can see, avocados are nutritional powerhouses that you should consider implementing in your diet (in moderation, of course, like all foods). In addition to being super tasty and healthy, avocados are surprisingly very versatile. While you may think avocados are always destined to become guacamole, you’re quite wrong. Creamy avocados are fabulous in both sweet and savory dishes. Inspired by Fitsugar‘s 10 Vegan Avocado Recipes article, I bring you (from the web) a few healthy recipes where avocados are the star of the show!
Please note: none of these recipes or photos are mine. They belong to the linked recipes and owners. 
Easy Guacamole by Cooking Light:

Light and Fresh Avocado Cream Verrine by Angela from Oh She Glows: If you love guacamole, you’ll love this dish by Angela from Oh She Glows.

Great Avocado Smoothie Recipes by Be Well Buzz: The avocados make this super rich, creamy, and tasty!

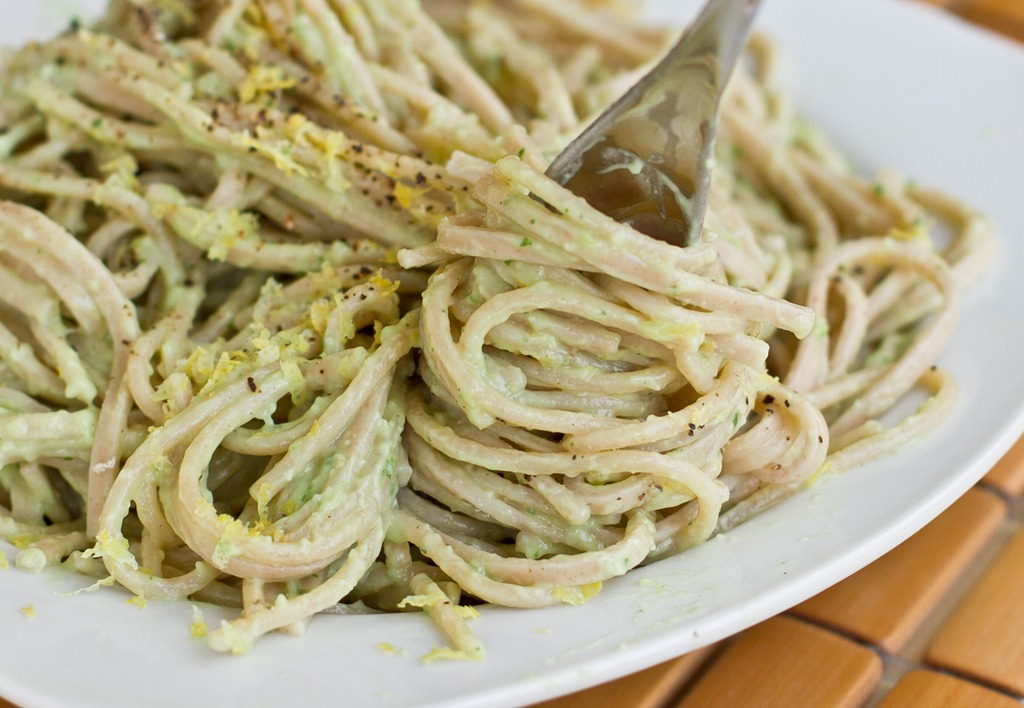
15 Minute Creamy Avocado Pasta by Angela from Oh She Glows: Vegan yet oh-so-creamy! This is on the top of my savory dish to-make list when I get home!
Vegan Avocado Frozen Yogurt by One Hungry Mess: Perfect for the upcoming summer!

Choco-Cado Pudding by Gina from The Fitnessista: I’ve said it a few times, so I think you get the idea: avocados add amazing creaminess to dishes, especially this chocolate pudding! It’s one of the healthiest, tastiest chocolate puddings you’ll ever try.

Chilled Double Chocolate Cake by Angela of Oh She Glows: Um, drool!! This would be a great recipe to bring to a party, but don’t tell people right away about the ingredients. Then, when people rave about it and ask what’s your secret, you can say, Avocado!

Shrimp Tostadas with Avocado Salsa by Eclectic Recipes: A wonderful dish for a meal outside on a warm summer’s night! Sub with tostada with a corn or flour tortilla to increase the healthiness (less fat) and freshness.

Double Chocolate Avocado Muffins by Muffin Tin Mania: Thanks to these healthy muffins, you can get away with eating chocolate for breakfast!

Roasted Tomato and Avocado Toast (with Goat Cheese) by Running with Tweezers

Question: What’s your favorite avocado recipe?
One of my all time favorite dishes is freshly made guacamole. Whenever my family eats at Chevys (or another restaurant with a similar option), we often get table-side-made guacamole with chips. At home, I prefer making it myself then eating store-bought guacamole. There’s seriously nothing like freshly made guac!
Five Friday Favorites: April 22
Happy Friday!!
Welcome to my first Friday Favorites! If you read other blogs, you may be familiar with this. Basically, Friday Favorites is where I talk about anything and everything I love that week (or Friday).
Let’s get started. 🙂
1. Justin’s Chocolate Hazelnut Butter

Seriously, you have to try this! If you’ve ever had Nutella, it’s like that but 100 times better! Seriously, since the first ingredient is hazelnut (and not sugar or oil, like Nutella), the hazelnut flavor is rich and amazing! The hazelnut is complimented wonderful by the rich (organic!) cocoa powder! The nutritional stats are great, so bonus there! Although Nutella and Justin’s Chocolate Hazelnut Butter (CHB) have similar calories per serving, CHB has more protein and less sugar per serving (and the fat in CHB is healthy fat). Chocolate + hazelnut = so, so great!
2. Vanilla Iced Coffee

I prefer my coffee iced, and lately I’ve been loving Bruegger’s French Vanilla Iced Coffee. It’s not sweetened (except I add Splenda after), so it has a great vanilla taste without being overly sweet.
I always drink mine too fast, so it’s gone before I remember to take a photo of it. So here is the above’s photo source.
3. Running
I started running again this week after a hiatus. I took a break because I was having some knee problems, and I’ve been incline walking on the treadmill in the mean time. But now, I’m back and running. I forgot (I know, how could I?) how much I love it!
Another thing I loved this week? This Youtube video, “Marathon Thoughts” by ImprovAsylum! If you’ve ever run a race before, you can probably relate to the film. I’ve run two half marathons, and I find this film hilarious. 😀
If the video above doesn’t load for you, you can watch it here.
4. Link Love
Here are some interesting articles/links I’ve found over the past few days.
- “Dieters Make Incorrect Assumptions Based on Food Names, Study Says” (fitsugar.com): Just because it’s called a salad doesn’t mean it’s healthy.
- “The New Digital Diet” (Prevention.com): 7 Ways Technology Helps You Lose Weight
- “Gwyneth Paltrow’s Favorite Recipes” (Self.com): Gwyneth’s Fudgy Chocolate Brownies look amazingly rich and delicious but are healthier than your average brownies.
- “Find Organic, Sustainable, and Local Fare With the Eat Well guide” (fitsugar.com): Read this article to learn more about the Eat Well Guide.
- Happy Easter (and Passover)! Two articles on the Easter treats you should (and shouldn’t) be eating: “6 Ridiculously Healthy (and Plain Ridiculous) Easter Treats” (prevention.com) and “8 Under–100 Calorie Easter Candies, Plus How Much Chocolate Bunny You Should Eat!” (Self.com).
5. My Mom!

Of course, she’s always one of my favorites! However, it was her birthday yesterday, so she is my favorite-favorite this week. 🙂 She has always been there for me when I need her, she had taught me a lot, and she has always shown me unconditional love! I miss her like crazy when I’m in college (as I am now), but it makes me appreciate her that much more! Happy (late) Birthday, mom! I love you!
Question: What’s one of your Friday Favorites?
Food Fashion Friday
I love food. You love food. We all love food. So, why not show our love for food in addition to eating it?
In this fun little post, I’ve compiled a few of my favorite food related shirts that I found while scouring the internet. I hope you enjoy – and maybe even buy one yourself!
Please note, most of these shirts are available in a variety of colors, styles, and sizes plus girls and guys cuts!
Love tofu, froyo, or sushi? Show it with these adorable shirts from TheShirtDudes on Etsy. (The photos are close-ups of the designs.)


I love cookies and milk!! This “Cookie Loves Milk” shirt from Threadless is adorable.

I know Katie from Healthy Diva Eats would love this next shirt from Hot Topic. (Katie, we can pretend the hamburger is a veggie burger, okay? Haha.)
It’s on sale but only available in XL and XXL. It would make for an adorable, comfy PJ shirt after a day of delicious eats. 🙂
 Eating local and homegrown veggies rocks. They taste better and are better for you (and the planet)! Show your support of Eating Local Greens (left shirt by joeseppi on Etsy) and Growing Your Own Food (right shirt by happyfamily on Etsy) with these shirts.


PB&J is one of my favorite food combos, so I’m in love with these two shirts: the left shirt is from Hot Topic and the right one is from Vintage Pop Tees on Cafe Press.


(Below left) I’ve added this shirt (from I Love Sriracha on Cafe Press) to the list in honor of my brother, who is in love with Sriracha and all things spicy!
(Below right) I love peanut butter and I’m a princess (my mom told me so!), so this shirt from Princess Gifts, Apparel and Decor at Cafe Press.


When I visited Vietnam (and Cambodia) during winter vacation 2009-2010, I ate some good Pho! Here is a cute and funny shirt from TheShirtDudes to honor all the delicious Vietnamese food I enjoyed during my travels! Gà means chicken. Now you know. 🙂

[TheShirtDudes have a bunch of other awesome food related shirts, so check them out!]
This shirt from theboldbanana declares “Baking is Sexy.” Heck yes, it is!!

Eating salad (and other healthy foods!) is the new black. Walk around looking cool with this Mr. Salad shirt from Threadless.

(Below left) Here is a shirt by nonfictiontees for you science-y (and eco/health?) types.
(Below right) This shirt, “Keep Calm and Carry Chocolate” shirt by redbrickwall, is very smart! Chocolate is a health and mood booster as well as oh-so-delicious and the perfect de-stresser! So follow my advice to follow this shirt’s advice!


And last but not least, the shirt that pretty much summarizes my life: the “I run so I can eat Ice Cream” shirt by The Fan Cafe at Cafe Press. If only it said “…and Chocolate and Peanut Butter and a Sense of Accomplishment,” then it would be the perfect definition of me. 🙂

Question 1: Which one is your favorite?
Question 2: What do you run (or exercise) for?
Top of the Hub
Top of the Hub: How I love thee! Let me count the ways…
Have you ever heard of Top of the Hub? It’s an award-winning restaurant on the 52nd floor of the Prudential Building in Boston, Ma. I’ve wanted to go to for a long time, but I had never had the chance to go… until last week!
 (
(My dad came to visit me in Boston in between two business trips. He was here for only two days, but boy, were those some fun-packed two days! When I was suggesting dinner locations to him a week prior, I included the Top of the Hub. I mentioned the amazing views and food he had (and that it was out of my budget), and he offered to treat me to dinner there. This is one of the many reasons he’s my favorite dad. 😉
And let me just say: Oh. My. Word. Top of the Hub was everything I had imagined and more. I’ve had a lot of good food in my life, and the food I enjoyed here was definitely some of the best I’ve had. Each and every piece I chewed was so incredibly amazing.
The view was incredible, the weather was beautiful, and we could see for miles…


The view definitely put us both in an excellent mood.

(Side note: Isn’t my Bambi necklace adorable? I got it at Forever 21 a year ago and it makes me smile.)
Top of the Hub features an impressive menu. There was a prix-fixe menu and two tasting options, but my dad and I decided to choose from the regular menu.

After ordering, we were brought fresh bread and butter. I ate a slice of bread (x3) with nuts (walnuts?) and dried berries (cranberries?). It was delicious! We don’t get fresh bread like this in our dining halls (or any other good bread really), so I was in heaven already!

To start, I had the Baby Spinach Salad with Roasted Walnuts, Pears, Vermont Goat Cheese, Port Wine Reduction, and Lemon Dressing. As soon as I read “goat cheese,” I knew this was the salad for me. Boy, do I miss good cheese!

I ordered the dressing on the side because I’m usually not a huge dressing fan. However, this dressing was special and deliciously tasty, and I dipped some forkfuls of salad into it. The dressing was sweet, creamy and slightly acidic and complemented the salad beautifully. I love salads that contain nuts, fruit, and cheese, so this was a great way to start my meal.
My dad ordered the Spicy Lobster Soup with Coconut Milk, Lemongrass, and Ginger. Of course, I had a spoonful or five! We agreed it was unbelievable and different from other lobster bisques/soups we’ve had – in a good way. The soup was creamy but not heavy, slightly spicy yet sweet.

Next, my dad and I shared the Jonah and Lump Crabmeat Cake with Avocado Cream and Roasted Pepper Remoulade. I love crab cakes, and this one was great! The creamy remoulade was perfect for the creamy, savory (yet almost slightly sweet), smooth-textured crab cake.

Now on to something truly phenomenal. I was soon presented with the best cooked fish I’ve ever had: Main Cedar Plank-Roasted Atlantic Salmon with Peppercorn Maple Pecan Butter and Heirloom Sweet Potatoes. Yes, it was as good as it sounds and looks – and so much more!

Let’s just start with the fact that it’s on a cedar plank, an actual piece of wood! This didn’t make the fish taste woodsy or anything, but the aroma was quite refreshing. My guess is the plank helped in the cooking of the fish. (The server said the fish was pan-seared, then baked in an oven.) It also made for great presentation.
That fish was pure perfection. It cut like butter, was so smooth, and did not taste overly fishy. The peppercorn maple pecan butter brought the fish to the next level in so many ways. I mean, just look at it…

The butter brought out and enhanced the natural flavors of the fish: the sweet, peppery, creamy butter brought out those notes in the fish as well.
My dad ordered the Block Island Swordfish au Poivre with Potato Gnocchi, English Peas, Morel Mushrooms, and Cognac Cream. He prefers firm fish, so he was very pleased with his fish choice. We both loved the gnocchi (one of my favorite foods) and morel mushrooms in the sauce, as well.

Now, the grand finale: dessert! This was by far my favorite part of the entire meal. Would you expect any less of me?
It didn’t take me long to decide what I wanted. I read the first item on the menu and knew it was destined to be in my belly: Valrhona Warm Chocolate Cake with Blackberry Ice Cream and Burgundy Sauce (freshly baked to order). My dad chose to try a local specialty: Boston Cream Pie with Raspberry Sauce and Crème Anglaise (upper-right corner of photo below).

Let’s talk about this chocolate cake, or should I say heaven?

This photo says it all…

The (lava) cake was perfectly baked, rich, and not overly sweet. Baked and fluffy on the outside, molten chocolate batter on the inside. Oh, did it ooze with chocolate-y goodness!
I would have been quite happy with just the cake, but the blackberry ice cream in a sugar cookie crust brought it over the top. The ice cream was refreshing against the richness of the chocolate cake, and I ate the entire cookie base because it was oh so good.

My dad’s Boston cream pie was scrumptious. If you aren’t familiar with the dessert, Boston Cream Pie, it is “a round cake that is split and filled with a custard or cream filling and frosted with chocolate” (Wikipedia). The sponge cake was light and fluffy, the custard filling was light and vanilla-y, and the chocolate rounded out the flavors nicely. The petite cake was so cute!

I left the Top of the Hub very satisfied and not overly full, which made me even more happy when I didn’t think it was possible. Top of the Hub is absolutely amazing! I definitely recommend this restaurant if you are visiting Boston, celebrating a special event, or just in need of delicious food!
I hope you enjoyed my restaurant review. 🙂 As far as future posts go, I have a few ideas (trail mix chocolate bars, anyone?), but I’d love to hear from you guys! Please comment below on any topics you’d like to see me write on in a future post! Thanks!
PS. I’m inspired by the fish and dessert I ate and want to “recreate” them myself! Neither can be duplicated, but I’ll try my hand at sweet butter with fish and lava cake. The lava cake will be a tricky one to “master,” but I’ll be sure to write a post when I get close. 🙂 You’ll have to wait until then though. In five short weeks, I’ll be home for break and have access to a kitchen once more!
Question 1: What is the best restaurant meal you’ve ever had? You just read about mine. 🙂
Question 2: What is your favorite dessert to order at a restaurant? More often than not, when freshly baked chocolate lava cake or cookies are on the menu (with ice cream!), that’s what I’ll order.
Chocolate PB Cup Cupakes w/PB Frosting
I’m in love… with a cupcake!
Who needs men when I have chocolate and peanut butter, my two of my favorite things? As soon as I found this recipe on Sweet Tooth Sweet Life, I knew I had to make these cupcakes asap. Once you finish reading this (and drooling a lot), I know you will want to make them, too!

These are absolutely one of the best cupcakes I’ve ever had or made. Chocolate cupcake + hidden Reese’s surprise + PB frosting + more Reese’s = foodgasm x 100!
So, without further ado, the recipe…
Chocolate Peanut Butter Cup Cupcakes w/Peanut Butter Frosting
Adapted from Sweet Tooth Sweet Life
Makes 24 cupcakes
Ingredients:

Cupcakes
- 1 box Devil’s Food cake mix
- 1-1/4 cup water
- 1/2 cup applesauce (or oil)
- 3 eggs
- 1 small bag small Reese’s peanut butter cups, unwrapped
Frosting
- 1/3 cup smooth natural peanut butter
- 3 cups powdered sugar
- 1-1/2 tsp. vanilla extract
- 1/4 cup milk (plus more to achieve desired consistency)
Note:
- If you are allergic to peanuts (or don’t like them), feel free to sub in another nut butter or sunflower seed butter.
- If needed, you can sub in another candy, like Hersey’s Kisses or another candy cup, for the Reese’s.
- Using apple sauce instead of the oil called for by the baking mix is a great way to cut extra fat. In this case, it worked super well and the cupcake was still moist. Score!
- To “healthify” the cupcakes even more, smear on some pure (pea)nut butter instead of the frosting.
Instructions:
Mix the cake mix, water, apple sauce, and eggs. This should take about 2 minutes on medium speed with an electric mixer.


Put liners into a muffin/cupcake pans and fill 2/3 the way full with batter.

Bake according to directions on package. My box says 350 degrees for 18-20 minutes. It took me about 16-18 minutes since I used apple sauce. Remember: if the baking time is for a full cake, the actual time for these cupcakes will be shorter since they are smaller, so keep an eye on them.


Let cupcakes cool for about 10 minutes. While you wait, take 24 of these lovely bits and unwrap them.

Gently press an upside down Reese’s cup (fattest part on top) into the center of the cupcakes. Make sure the cupcakes are still slightly warm, so this can be done easily, but not too warm, so the Reese’s cups don’t melt completely.

Now comes the hard part, letting the cupcakes cool. I know it’s hard to resist a warm cupcake, but trust me, it’s worth the wait. Among other reasons, it’s easier to ice the cupcakes when the chocolate isn’t melty.
But I won’t blame you if you sneak a warm cupcake. 😉
Once the cupcakes have cooled, it’s time to make the peanut butter icing, aka icing of the PB gods.
Frosting: Blend the PB, powdered sugar, and vanilla (in the amounts from the frosting ingredient list). Add the milk and mix on medium speed until smooth and creamy. If needed, add a bit more milk at a time to reach the desired consistency.
This is a great frosting that can be used for all sorts of recipes!

If you like to keep things simple, use a knife to frost the cupcakes. If you like to be fancy, you can use a pastry bag. If you are somewhere in between and like easy clean up (like me), put all the frosting in a medium-sized plastic bag and cut a small piece off of one the bottom corners. Squeeze out the contents slowly as you make whatever frosting form or design you desire.

Now, frost to your heart’s content!! Be creative with it!

Little swirls of heaven!
If you so desire (and why wouldn’t you?), use remaining/extra Reese’s cups as extra toppings. Cut one in half, and top each cupcake with either one or two halves.

That looks absolutely divine!
Since I made these cupcakes for a potluck I attended, I transferred the cupcakes to baking pans for easy transportation!

And there you have it: chocolate PB cup cupcakes with PB frosting!
You’re welcome. 😉
Now go out and make them. I demand you!
… And feel free to ship me some (since I’m back at school with no oven). 😉
Question: What is your favorite kind of cupcake or cake?
Fueling My Addiction: No Bake Peanut Butter Cookies
Hi, my name is Lara, and I’m a peanut butter addict.
Don’t try to cure me. I can’t be fixed. If loving peanut butter is wrong, I don’t want to be right.
When I stumbled across these No Bake Peanut Butter Cookies on How Sweet It Is, I knew I had to make them as soon as I could. By the way, I am also addicted to no bake recipes. My parents had a party a few days back, and I took that as the perfect opportunity to make these. They are so easy (like most of my recipes, haha) and out of this world delicious! They aren’t the healthiest things ever, but they are so satisfying (thanks to the peanut butter) in moderation!
No-Bake Peanut Butter Cookies

Adapted from How Sweet It Is
Makes about 20 cookies – I doubled the recipe and made almost 60 smaller cookies.
- 1 1/4 cups graham cracker crumbs
- 1/2 + 1 tablespoon cup creamy peanut butter
- 1/3 cup brown rice syrup – I used agave syrup. You can sub corn or maple syrup.
- 1 teaspoon vanilla extract
- 1/4 cup sugar
- 1/2 teaspoon cinnamon
- Pinch of ginger – I didn’t use this because I didn’t have any.
- Optional: chocolate (for drizzling)
Instructions:
Step 1: Make graham crackers into crumbs.

I did this by putting the grahams into a plastic bag and smashing the bag with a peanut butter jar.

This worked pretty well, but I should have done it longer because there were still some larger crumbs.

You want a flour-like consistency, or else forming the cookies will be hard. I also suggest using a food processor or Vitamix to get this consistency.
Step 2: Add the rest of the ingredients.

Pool of peanut butter and agave syrups = makes me drool!

Vanilla river.

Final “layer” of ingredients.
Step 3: Mix it all up! The mixture will be crumbly. It may take a while for the mixture to come together, but it eventually will.

Step 4: Form dough into uniform balls.

The original recipe suggests 1-inch balls. I made them a bit smaller (maybe 3/4-inch). It’s really up to you and your preferences. Since these are no bake, the size won’t affect the “baking” outcome.
If the balls are sticking together well enough, add a bit of peanut butter or agave. I didn’t have to do this.

Drool!
Step 5: If you want cookies (and not balls), either flatten first with your fingers and then indent with fork or flatten with fork while making indentations. I did the latter.

They look like true peanut butter cookies and taste like them, too, but they are no bake! Yay!

Step 6: If you want to “ice” with chocolate, melt the chocolate and drizzle on top.

You can either melt the chocolate in a double broiler… or be lazy like me and do it in the microwave.

Drool… Boy, my keyboard is getting dirty. 😉

I topped 1/2 of the cookies in chocolate just in case some of the party guests didn’t like chocolate. But who was I kidding? Who doesn’t love chocolate and peanut butter together? Stupid people.
And there y’all have it! No Bake Peanut Butter Cookies, with a chocolate topping option!
Now, go out and make them. I promise you won’t be sorry!
Question: What is your favorite flavor combination in cookies or other baked cookies?
I love PB + chocolate and PB + J.
 (Source)
If only… Haha.
